SAML 2.0 Single Sign-On (SSO)
OpenCVE supports SAML2-based Single Sign-On, allowing your team members to sign in using your company's Identity Provider (Okta, Azure AD, Google Workspace, OneLogin, etc.).
Enterprise Cloud only
SAML2 SSO is exclusively available on the Enterprise plan of the OpenCVE.io Cloud offering. It is not included in the community (self-hosted) edition.
Overview
SAML2 SSO lets organizations centralize authentication so that users sign in through their existing corporate Identity Provider (IDP) instead of managing a separate password for OpenCVE.
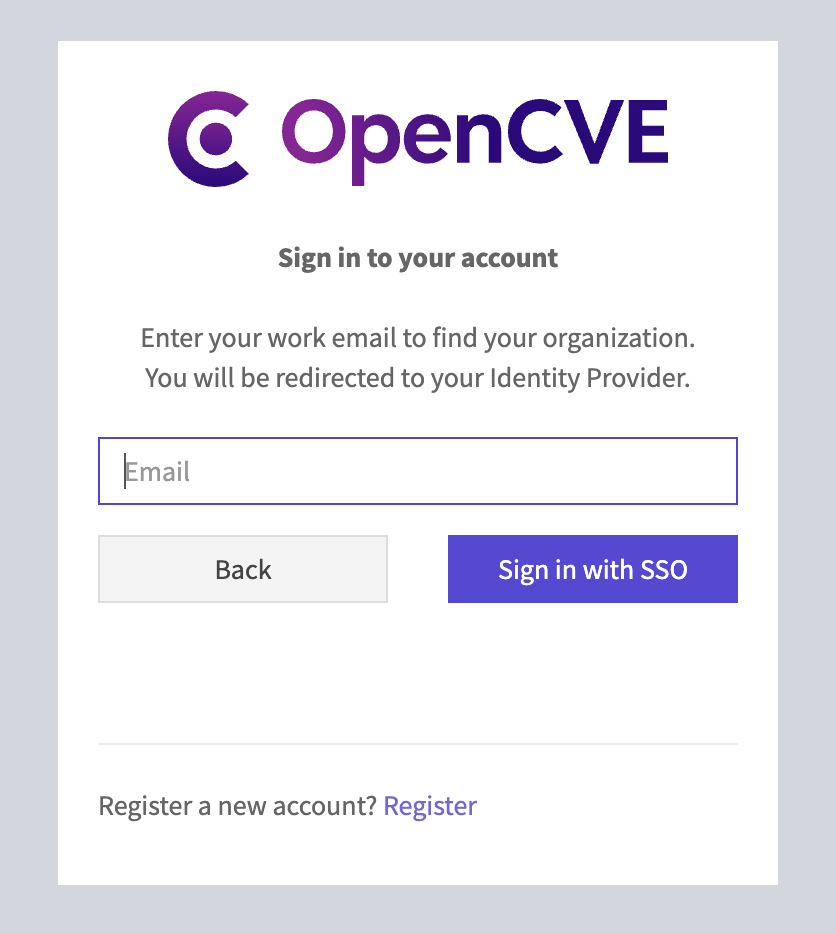
When a user clicks Sign in with SSO on the login page and enters their work email, OpenCVE checks whether the email domain is associated with a configured and verified SAML Identity Provider. If it is, the user is seamlessly redirected to the IDP to authenticate.
On first login, an OpenCVE account is automatically created and the user is added to the organization.
Prerequisites
Before you begin, make sure you have:
- An OpenCVE organization on the Enterprise plan.
- Administrator (owner) access to both your organization in OpenCVE and your Identity Provider.
- Access to DNS management for the email domains you want to verify.
Step 1 — Register OpenCVE in your Identity Provider
Start by registering OpenCVE as a Service Provider (SP) application in your IDP. The exact steps depend on your provider, but you will generally need the following values:
| Setting | Value |
|---|---|
| ACS URL (Assertion Consumer Service) | https://app.opencve.io/saml2/acs/ |
| SP Entity ID | https://app.opencve.io/saml2/metadata/ |
| SP Metadata URL | https://app.opencve.io/saml2/metadata/ |
| Name ID Format | Transient |
| Binding for ACS | HTTP-POST |
Attributes to send
Make sure your IDP is configured to send at least the following attributes in the SAML assertion:
| SAML Attribute | Description | Required |
|---|---|---|
mail (or email) |
User's email address | Yes |
givenName (or firstName, firstname) |
First name | No |
sn (or lastName, lastname) |
Last name | No |
Only the email attribute is strictly required. First and last names are optional but recommended so that user profiles are populated automatically.
Step 2 — Configure SAML in OpenCVE
Once your IDP application is set up, go to your organization settings in OpenCVE and open the SAML / SSO tab. You will see four configuration sections.
SAML Authentication Configuration
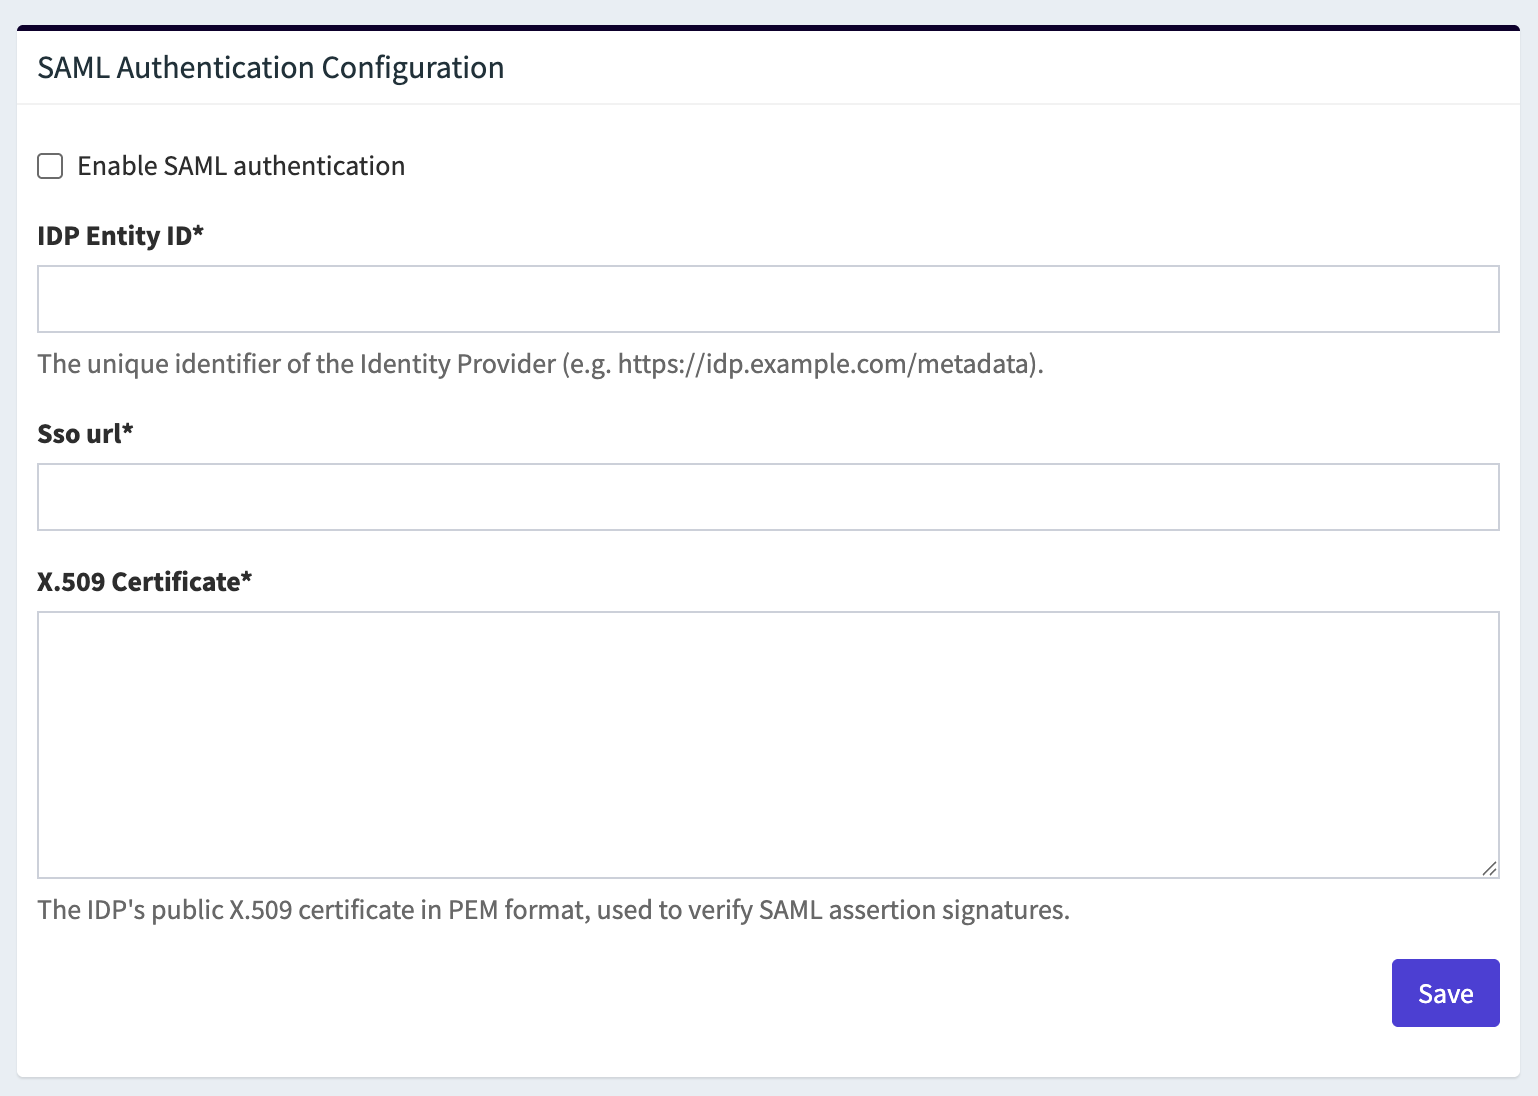
Fill in the following fields:
Enable SAML authentication
Toggle this on to activate SAML login for your organization. When disabled, users with matching email domains will fall back to standard login.
IDP Entity ID
The unique identifier of your Identity Provider. You will find this in your IDP's SAML settings or metadata. It usually looks like a URL:
- Okta:
http://www.okta.com/exk1234567890 - Azure AD:
https://sts.windows.net/<tenant-id>/
Single Sign-On URL
The IDP endpoint where OpenCVE sends SAML authentication requests (HTTP-Redirect binding). This is sometimes called "SSO URL", "Login URL", or "SAML 2.0 Endpoint":
- Okta:
https://yourcompany.okta.com/app/yourapp/exk.../sso/saml - Azure AD:
https://login.microsoftonline.com/<tenant-id>/saml2
X.509 Certificate
The public certificate of your IDP in PEM format. It is used to verify the signatures on SAML assertions. You can usually download it from your IDP's SAML configuration page. Paste the full certificate including the -----BEGIN CERTIFICATE----- and -----END CERTIFICATE----- lines.
Click Save to store the configuration.
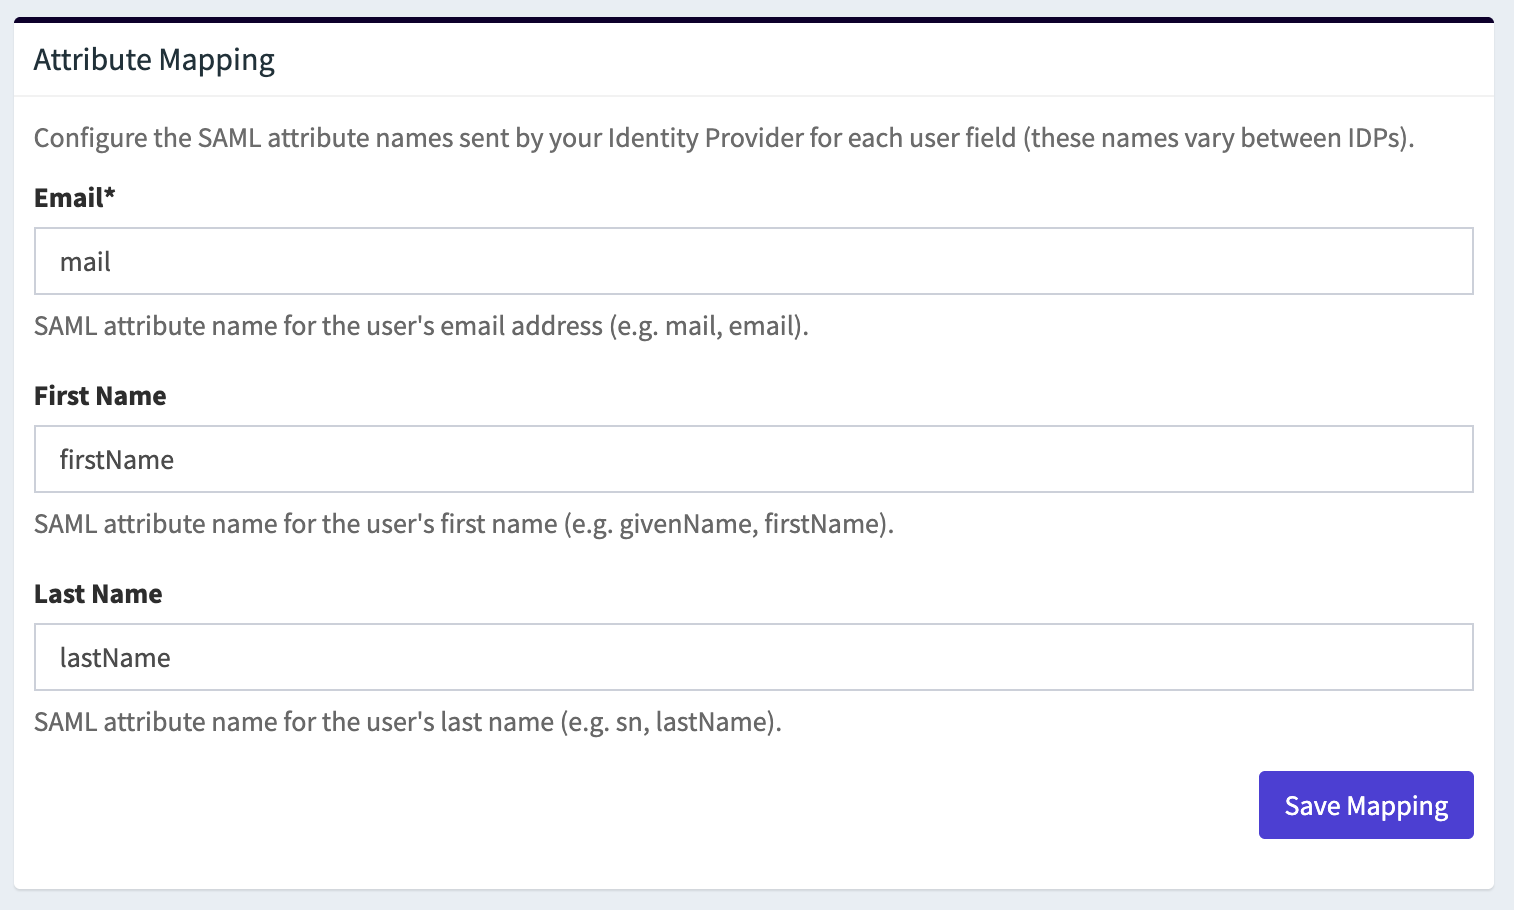
Step 3 — Customize the Attribute Mapping
After saving the SAML configuration, the Attribute Mapping section becomes available. It lets you tell OpenCVE which SAML attribute name your IDP uses for each user field.
| Field | Description | Default value |
|---|---|---|
| The SAML attribute that carries the user's email address | mail |
|
| First Name | The SAML attribute for the user's first name | firstName |
| Last Name | The SAML attribute for the user's last name | lastName |
If your IDP sends attributes with different names (for example emailAddress instead of mail, or surname instead of sn), update the values here and click Save Mapping.
Step 4 — Add and Verify Domains
The Domains section controls which email domains are routed to your IDP for authentication. A domain must be verified via a DNS TXT record before users with that email domain can sign in via SSO.
Add a domain
Type a domain (e.g. acme.com) in the input field and click Add domain. The domain appears in the list with an Unverified status.
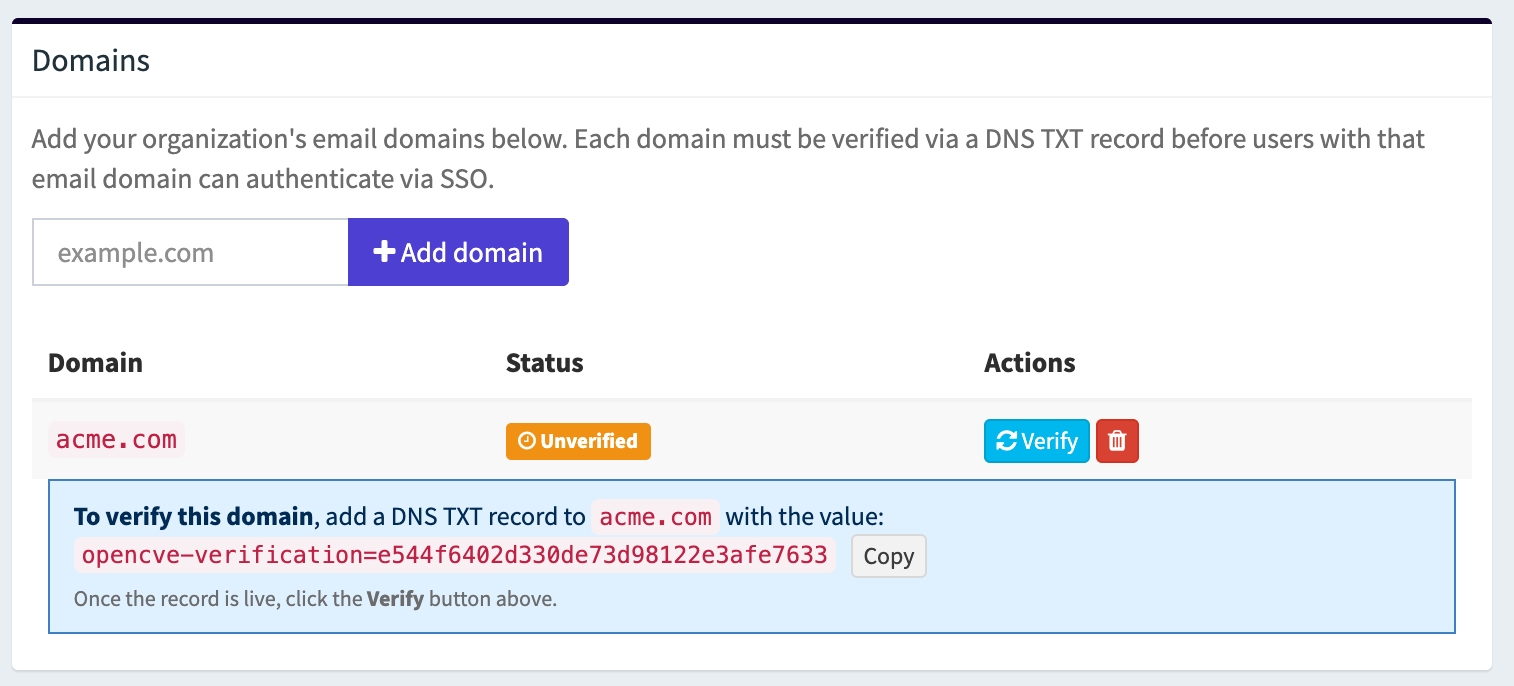
Verify a domain
For each unverified domain, OpenCVE generates a unique verification token displayed below the domain entry. To prove domain ownership:
- Copy the token value (e.g.
opencve-verification=a1b2c3d4e5f6...). - Add a TXT record to the DNS zone of the domain with this token as the value.
- Wait for DNS propagation (this can take a few seconds to a few hours depending on your DNS provider).
- Click the Verify button next to the domain.
If the TXT record is found, the domain status changes to Verified and users with an email address on that domain can authenticate via SSO. If the record is not found, the domain stays unverified and you can retry later.
Info
You can add multiple domains to a single SAML configuration. Each domain must be verified individually.
Step 5 — Test the Configuration
- Save your SAML configuration and make sure at least one domain is verified.
- Open a private / incognito browser window.
- Go to the OpenCVE login page and click Sign in with SSO.
- Enter an email address that matches one of the verified domains and click Sign in with SSO.
- You will be redirected to your IDP. Authenticate there.
- After successful authentication you will be redirected back to OpenCVE, signed in and added to your organization.
You should see a confirmation message such as "Successfully signed in as user@acme.com."
Troubleshooting
If something goes wrong, check the following:
| Issue | What to check |
|---|---|
| Not redirected to IDP | Make sure SAML authentication is enabled, the domain is verified, and the email you entered matches a configured domain. |
| IDP shows an error | Verify that the ACS URL and SP Entity ID configured in your IDP match the values shown in the Identity Provider Information section. |
| Redirected back but not signed in | Check that the X.509 certificate is correct and complete, and that the email attribute is being sent in the SAML assertion. |
| "Could not find value" warnings | The attribute names sent by your IDP do not match the configured mapping. Update the Attribute Mapping section to match your IDP's attribute names. |
| Domain verification fails | Ensure the DNS TXT record has propagated. You can verify it manually with dig TXT yourdomain.com or an online DNS lookup tool. |
Removing the SAML Configuration
To disable SAML SSO for your organization, click the Remove SAML Configuration button at the top of the SAML Authentication Configuration section.
This deletes the IDP settings, the attribute mapping, and all associated domains. Users will revert to standard email/password or social login.